Nginx入门
Nginx简介
简介
Nginx 是一款轻量级的 Web 服务器/反向代理服务器及电子邮件(IMAP/POP3)代理服务器,其特点是占有内存少,并发能力强。
特点
- 高并发
- 内存消耗少
- 成本低廉
- 配置简单
- 内置健康检查功能
- 节省带宽
- 稳定性高
- 支持热部署
常见WEB服务器
-
Apache
-
Lighttpd
-
Tomcat
-
Tengine
-
IBM WebSphere
-
IIS
-
LVS
-
HAProxy
Nginx安装
在线安装
Linux
apt install nginx
yum install nginx
查询默认配置文件
nginx -t
Windows
官网下载ngixn文件解压至制定目录
源码安装
- 下载源码包(包含基础依赖包,如prce库)
- ./configure 根据需求进行配置
- make install 指定目录安装
wget http://nginx.org/download/nginx-1.16.1.tar.gz
tar -zxvf nginx-1.16.1.tar.gz
./configure
    --sbin-path=/usr/local/nginx/nginx
    --conf-path=/usr/local/nginx/nginx.conf
    --pid-path=/usr/local/nginx/nginx.pid
    --with-http_ssl_module
make && make install
Nginx基础
基础使用
启动
nginx #正常启动应用
nginx -c /etc/nginx/conf/nginx.conf #指定配置文件启动
停止
nginx -s stop #停止nginx应用
pkill -9 nginx #停止nginx所有进程
kill -INT `cat /run/nginx.pid` #指定pid发起停止信号
平滑重启
nginx -s reload #重启应用
kill -HUP `cat /run/nginx.pid` #指定pid发起重启信号
基础配置
目录结构
/etc/nginx/
├── conf.d
├── default.d
├── fastcgi.conf
├── fastcgi.conf.default
├── fastcgi_params
├── fastcgi_params.default
├── koi-utf
├── koi-win
├── mime.types
├── mime.types.default
├── nginx.conf
├── nginx.conf.default
├── nginx.conf.rpmnew
├── scgi_params
├── scgi_params.default
├── uwsgi_params
├── uwsgi_params.default
└── win-utf
/usr/share/nginx/
├── html
│   ├── 404.html
│   ├── 50x.html
│   ├── 50x.html_bak
│   ├── en-US -> ../../doc/HTML/en-US
│   ├── icons
│   │   └── poweredby.png -> ../../../pixmaps/poweredby.png
│   ├── img -> ../../doc/HTML/img
│   ├── index.html -> ../../doc/HTML/index.html
│   ├── index.html_bak
│   ├── nginx-logo.png
│   └── poweredby.png -> nginx-logo.png
└── modules
    ├── mod-http-image-filter.conf
    ├── mod-http-perl.conf
    ├── mod-http-xslt-filter.conf
    ├── mod-mail.conf
    └── mod-stream.conf
/var/log/nginx/
├── access.log
└── error.log

/run/nginx.pid
配置文件
#主配置
user www www; #使用用户和组
worker_processes auto; #工作进程数
error_log /var/log/nginx/error.log; #错误日志保存位置
pid /run/nginx.pid; #进程pid存放位置

include /usr/share/nginx/modules/*.conf;  #模块加载目录
#事件模型
events {
    worker_connections 1024; #最大连接数
}
#http服务器
http {
    log_format  main  '$remote_addr - $remote_user [$time_local] "$request" '
                      '$status $body_bytes_sent "$http_referer" '
                      '"$http_user_agent" "$http_x_forwarded_for"'; #日志输出格式

    access_log  /var/log/nginx/access.log  main; #标准日志保存位置

    sendfile            on; #开启高效文件传输模式,对于普通应用设为 on,如果用来进行下载等应用磁盘IO重负载应用,可设置为off,以平衡磁盘与网络I/O处理速度,降低系统的负载。注意:如果图片显示不正常把这个改成off。
    tcp_nopush          on;	#此选项允许或禁止使用socke的TCP_CORK的选项,此选项仅在使用sendfile的时候使用
    tcp_nodelay         on; #将连接转变为长连接
    keepalive_timeout   65; #长连接超时时间,单位是秒
    types_hash_max_size 2048;

    include             /etc/nginx/mime.types; #设定mime类型,类型由mime.type文件定义
    default_type        application/octet-stream;

    include /etc/nginx/conf.d/*.conf; #加载其他配置文件
    # 虚拟主机
    server {
        listen       80 default_server;
        listen       [::]:80 default_server; #监听端口
        server_name  _;  #域名,可以有多个
        root         /usr/share/nginx/html; #web服务器根目录

        include /etc/nginx/default.d/*.conf; #加载其他配置文件

        location / {
            proxy_pass        http://127.0.0.1/;
            proxy_set_header   Host             $host;
            proxy_set_header   X-Real-IP        $remote_addr;
            proxy_set_header   X-Forwarded-For  $proxy_add_x_forwarded_for; #获取用户真实IP
        }

        error_page 404 /404.html;
            location = /40x.html {
        }

        error_page 500 502 503 504 /50x.html;
            location = /50x.html {
        }
    }
}
基础优化
日志文件配置
#!/bin/bash
#脚本用于切割nginx日志文件
#请配置脚本为每天00:00启动
#crontab -e 00 00 * * * /bin/bash /root/spilt_nginx_log.sh

#设置nginx日志文件目录
log_path="/var/log/nginx/"

#根据时间切割日志文件
mkdir -p ${log_path}${date -d "yesterday" +"%Y%m"}
mv ${log_path}access.log ${log_path}${date -d "yesterday" +"%Y%m"}/access_${date -d "yesterday" +"%Y%m%d"}.log

#重启nginx
kill -HUP `cat /run/nginx.pid`
压缩输出配置
gzip on;
gzip_mini_length 1k;
gzip_buffer 4 16k;
gzip_http_version 1.1;
gzip_comp_level 2;
gzip_tesxt_plain application/x-javascript text/css application/xml;
gzip_vary on;
缓存配置
location ~ .*\.{git|jpg|jpeg|png|bmp|swf}$
{
    expires 30d;
}
location ~ .*\.{js|css}?$
{
    expires 1h;
}
URL重写
#根据浏览器标识,访问资源重定向到指定文件目录(以下为IE)
if ($http_user_agent ~ MSIE ) {
   rewrite ^(.*)$ /msie/$1 break;
}

#将移动客户端的请求重定向到其他服务器
if    ($http_user_agent ~* '(iphone|ipod)' )  {
    rewrite ^.+    http://mobile.site.com$uri;
}

#.用户使用POST方式请求数据时候,返回405:
if ($request_method = POST ) {
   return 405;
}

#访问xxxx时重定向到xxxx目录
location /xxxx {
     rewrite ^/xxxx/.*$ /xxxx permanent;
}
Nginx常用功能
反向代理
 http{
 	server{
        listen       80;
        server_name  localhost;
        location / {
        proxy_pass http://localhost:8080;
 	}
 }
负载均衡
http {
 upstream myproject {
 server 127.0.0.1:8000 weight=3;
 server 127.0.0.1:8001;
 server 127.0.0.1:8002;
 server 127.0.0.1:8003;
 }
 	server {
 	listen 80;
	 server_name www.domain.com;
 	location / {
 		proxy_pass http://myproject;
 		}
 	}
}
正向代理
http{
    server{
        listen 8888;
        location / {
            resolver 8.8.8.8;
            proxy_pass	http://$http_host$request_uri;
        }
    }
}
HTTP服务器(SSL)
http {
  server {
    listen	443;
    server_name	localhost;
    ssl	on;
    ssl_certificate      /usr/local/nginx/conf/cert.pem;
    ssl_certificate_key  /usr/local/nginx/conf/cert.key;
  }
}
文件服务器
http{
    server{
        listen 80;
        server_name localhost;
        root /usr/share/nginx/html/;
    }
}
负载均衡
http{
	upstream myproject {
        server 192.168.1.112:8001;
        server 192.168.1.112:8002;
        server 192.168.1.112:8003;
    	}

	proxy_buffering on;
	proxy_cache_valid any 10m;
	proxy_cache_path /data/cache levels=1:2 keys_zone=my_cache:10m max_size=1000m inactive=600m;
	proxy_temp_path /data/temp;
	proxy_buffer_size 4k;
	proxy_buffers 100 8k;

	server {
    	listen       80;
    	server_name  localhost jeson.t.imooc.io;
    	location / {
        	proxy_cache my_cache;  #开启缓存
       		proxy_pass http://myproject;
            proxy_cache_key $host$uri$is_args$args; #定义缓存的key
    }
}
Nginx模块
HTTP模块
- ngx_http_core_module
- ngx_http_access_module
- ngx_http_addition_module
- ngx_http_api_module
- ngx_http_auth_basic_module
- ngx_http_auth_jwt_module
- ngx_http_auth_request_module
- ngx_http_autoindex_module
- ngx_http_browser_module
- ngx_http_charset_module
- ngx_http_dav_module
- ngx_http_empty_gif_module
- ngx_http_f4f_module
- ngx_http_fastcgi_module
- ngx_http_flv_module
- ngx_http_geo_module
- ngx_http_geoip_module
- ngx_http_grpc_module
- ngx_http_gunzip_module
- ngx_http_gzip_module
- ngx_http_gzip_static_module
- ngx_http_headers_module
- ngx_http_hls_module
- ngx_http_image_filter_module
- ngx_http_index_module
- ngx_http_js_module
- ngx_http_keyval_module
- ngx_http_limit_conn_module
- ngx_http_limit_req_module
- ngx_http_log_module
- ngx_http_map_module
- ngx_http_memcached_module
- ngx_http_mirror_module
- ngx_http_mp4_module
- ngx_http_perl_module
- ngx_http_proxy_module
- ngx_http_random_index_module
- ngx_http_realip_module
- ngx_http_referer_module
- ngx_http_rewrite_module
- ngx_http_scgi_module
- ngx_http_secure_link_module
- ngx_http_session_log_module
- ngx_http_slice_module
- ngx_http_spdy_module
- ngx_http_split_clients_module
- ngx_http_ssi_module
- ngx_http_ssl_module
- ngx_http_status_module
- ngx_http_stub_status_module
- ngx_http_sub_module
- ngx_http_upstream_module
- ngx_http_upstream_conf_module
- ngx_http_upstream_hc_module
- ngx_http_userid_module
- ngx_http_uwsgi_module
- ngx_http_v2_module
- ngx_http_xslt_module
邮箱模块
- ngx_mail_core_module
- ngx_mail_auth_http_module
- ngx_mail_proxy_module
- ngx_mail_ssl_module
- ngx_mail_imap_module
- ngx_mail_pop3_module
- ngx_mail_smtp_module
Strean模块
- ngx_stream_core_module
- ngx_stream_access_module
- ngx_stream_geo_module
- ngx_stream_geoip_module
- ngx_stream_js_module
- ngx_stream_keyval_module
- ngx_stream_limit_conn_module
- ngx_stream_log_module
- ngx_stream_map_module
- ngx_stream_proxy_module
- ngx_stream_realip_module
- ngx_stream_return_module
- ngx_stream_split_clients_module
- ngx_stream_ssl_module
- ngx_stream_ssl_preread_module
- ngx_stream_upstream_module
- ngx_stream_upstream_hc_module
- ngx_stream_zone_sync_module
SLB实例
产品架构
基础架构说明
阿里云当前提供四层和七层的负载均衡服务。
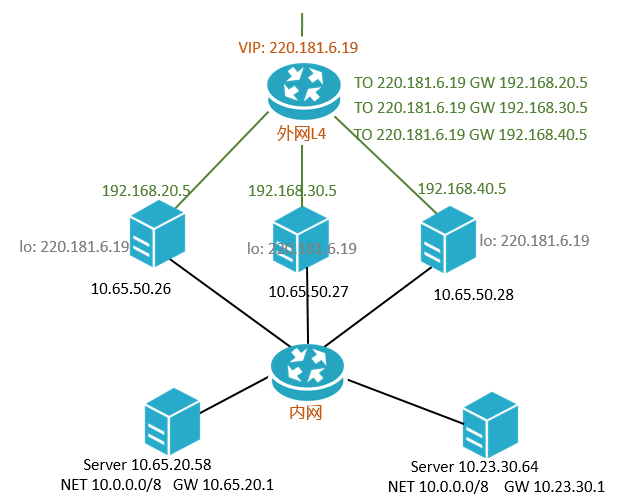
- 四层采用开源软件LVS(Linux Virtual Server)+ keepalived的方式实现负载均衡,并根据云计算需求对其进行了个性化定制。
- 七层采用Tengine实现负载均衡。Tengine是由淘宝网发起的Web服务器项目,它在Nginx的基础上,针对有大访问量的网站需求,添加了很多高级功能和特性。
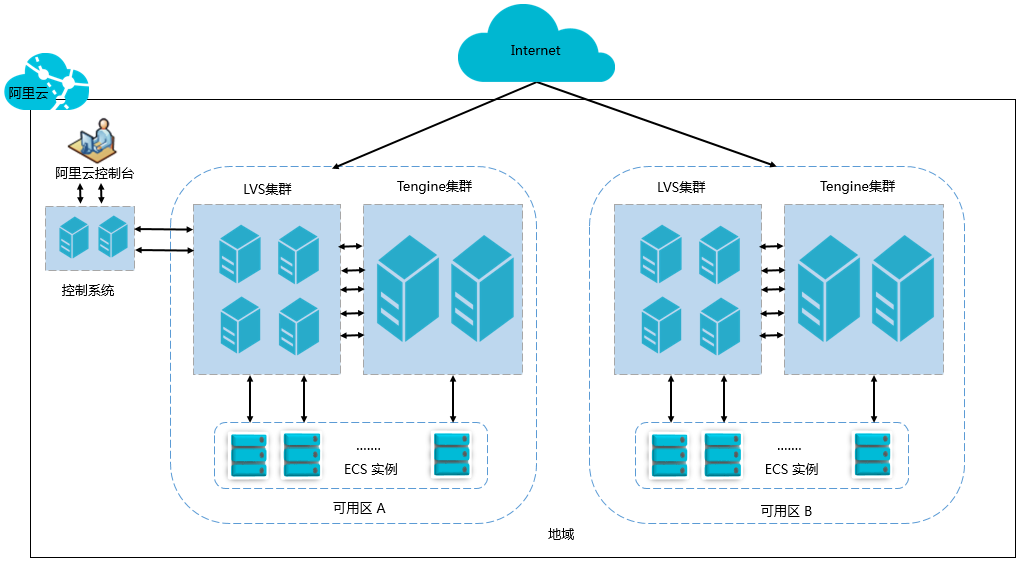
如下图所示,各个地域的四层负载均衡实际上是由多台LVS机器部署成一个LVS集群来运行的。采用集群部署模式极大地保证了异常情况下负载均衡服务的可用性、稳定性与可扩展性。
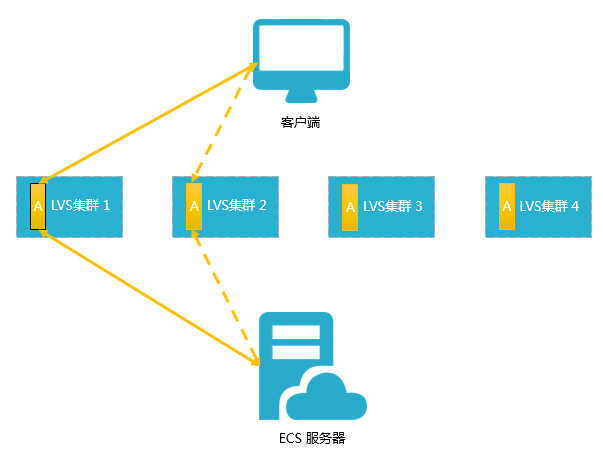
LVS集群内的每台LVS都会进行会话,通过组播报文同步到该集群内的其它LVS机器上,从而实现LVS集群内各台机器间的会话同步。如下图所示,当客户端向服务端传输三个数据包后,在LVS1上建立的会话A开始同步到其它LVS机器上。图中实线表示现有的连接,图中虚线表示当LVS1出现故障或进行维护时,这部分流量会走到一台可以正常运行的机器LVS2上。因而负载均衡集群支持热升级,并且在机器故障和集群维护时最大程度对用户透明,不影响用户业务。
说明 对于连接未建立(三次握手未完成),或者已建立连接但未触发会话同步机制,热升级不保证连接不中断,需要依靠客户端重新发起连接。
入网流量路径
对于入网流量,负载均衡会根据用户在控制台或API上配置的转发策略,对来自前端的访问请求进行转发和处理,数据流转如图 1所示。
图 1. 入网流量路径
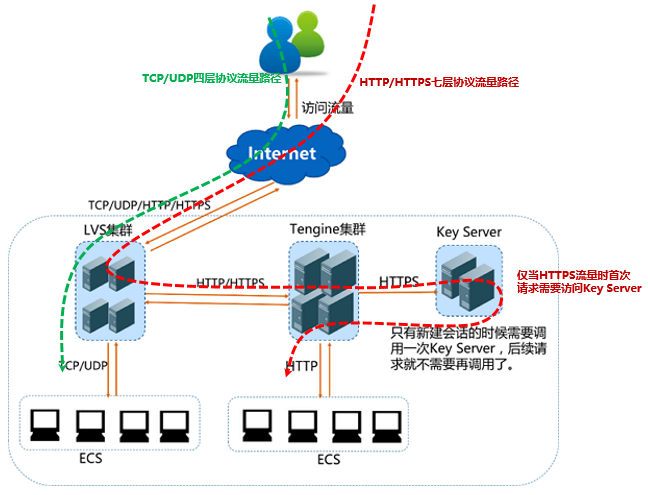
- TCP/UDP协议和HTTP/HTTPS协议的流量都需要经过LVS集群进行转发。
- LVS集群内的每一台节点服务器均匀地分配海量访问请求,并且每一台节点服务器之间都有会话同步策略,以保证高可用。
- 如果相应的负载均衡实例服务端口使用的是四层协议(TCP或UDP),那么LVS集群内每个节点都会根据负载均衡实例负载均衡策略,将其承载的服务请求按策略直接分发到后端ECS服务器。
- 如果相应的负载均衡实例服务端口使用的是七层HTTP协议,那么LVS集群内每个节点会先将其承载的服务请求均分到Tengine集群,Tengine集群内的每个节点再根据负载均衡策略,将服务请求按策略最终分发到后端ECS服务器。
- 如果相应的负载均衡实例服务端口使用的是七层HTTPS协议,与上述HTTP处理过程类似,差别是在按策略将服务请求最终分发到后端ECS服务器前,先调用Key Server进行证书验证及数据包加解密等前置操作。
出网流量路径
负载均衡SLB和后端ECS之间是通过内网进行通信的。
-
如果ECS仅仅处理来自负载均衡的请求,可以不购买公网带宽(ECS公网IP/弹性公网IP/NAT网关等)。
说明 早期创建的一些ECS上直接分配了公网IP(ifconfig中可见接口上分配的公网ip地址),此类ECS如果仅通过SLB对外提供服务,即便在公网接口(网卡)上看到有流量统计,也不会产生ECS的公网费用。
-
如果需要直接通过后端ECS对外提供服务,或后端ECS有访问外网的需求, 那么需要相应的配置或购买ECS公网IP/弹性公网IP/NAT网关等服务。
ECS的公网流量访问路径如图 2所示。
图 2. 出网流量路径
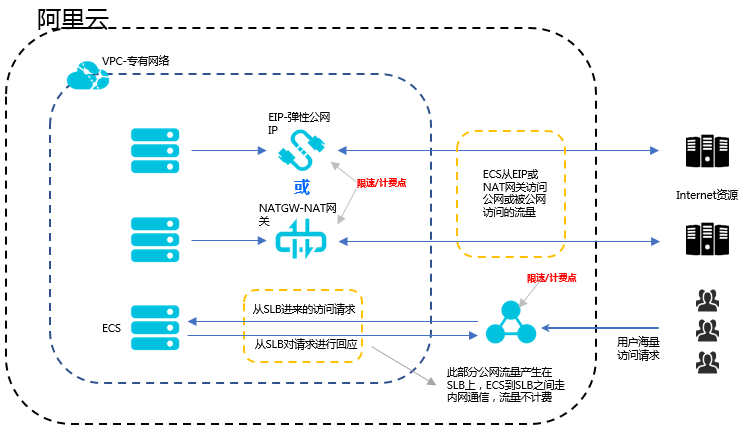
总体原则:流量从哪里进来,就从哪里出去。
- 通过负载均衡进入的流量在负载均衡SLB上限速/计费,仅收取出方向流量费用,入方向流量不收取(在未来可能会改变),SLB到ECS之间是阿里云内网通信,不收取流量费用。
- 来自弹性公网IP/NAT网关的流量,分别在弹性公网IP/NAT网关上进行限速/计费,如果在购买ECS时选择了公网带宽,限速/计费点在ECS上。
- 负载均衡SLB仅提供被动访问公网的能力,即后端ECS只能在收到通过负载均衡SLB转发来的公网的请求时,才能访问公网回应该请求,如后端ECS希望主动发起公网访问,则需要配置/购买ECS公网带宽、弹性公网IP或NAT网关来实现。
- ECS公网带宽(购买ECS时配置)、弹性公网IP、NAT网关均可以实现ECS的双向公网访问(访问或被访问),但没有流量分发和负载均衡的能力。
快速入门